 Danielle Canstello
The Google Analytics platform that most site owners know and love is an extremely powerful tool. After all, even its most basic features provide reliable and easy-to-use data that can improve the site and attract more traffic.
However, the basic version of Google Analytics is not enough for ecommerce businesses. You need more than the general data it usually provides (type of users that visit your site, the average time spent on page, and more). As an ecommerce business owner, you must know how site users’ actions are affecting your sales and why.
For this, you’ll need to implement Google Analytics for Ecommerce. This is an advanced version of Analytics that will allow you to better track ecommerce operations and correlate sales data (transactions, revenue, and so on) with the information on site usage (bounce rate, sessions, traffic source, and more).
Once you do so, you’ll be able to understand which of your landing pages are bringing sales and why, how the site is performing in sales, and where you need to improve.
Since Google Analytics is a free platform designed to be used by everyone, the ecommerce feature is not automatically activated. You need to set it up, and below you can read a detailed guide on how to do it the right way.
Setting up Google Analytics for Ecommerce
We are going to assume you know how to set up a basic Google Analytics account and that you already have it running on your site. So, we’ll skip directly to the setup of the ecommerce feature.
#1: Switch ON ecommerce tracking
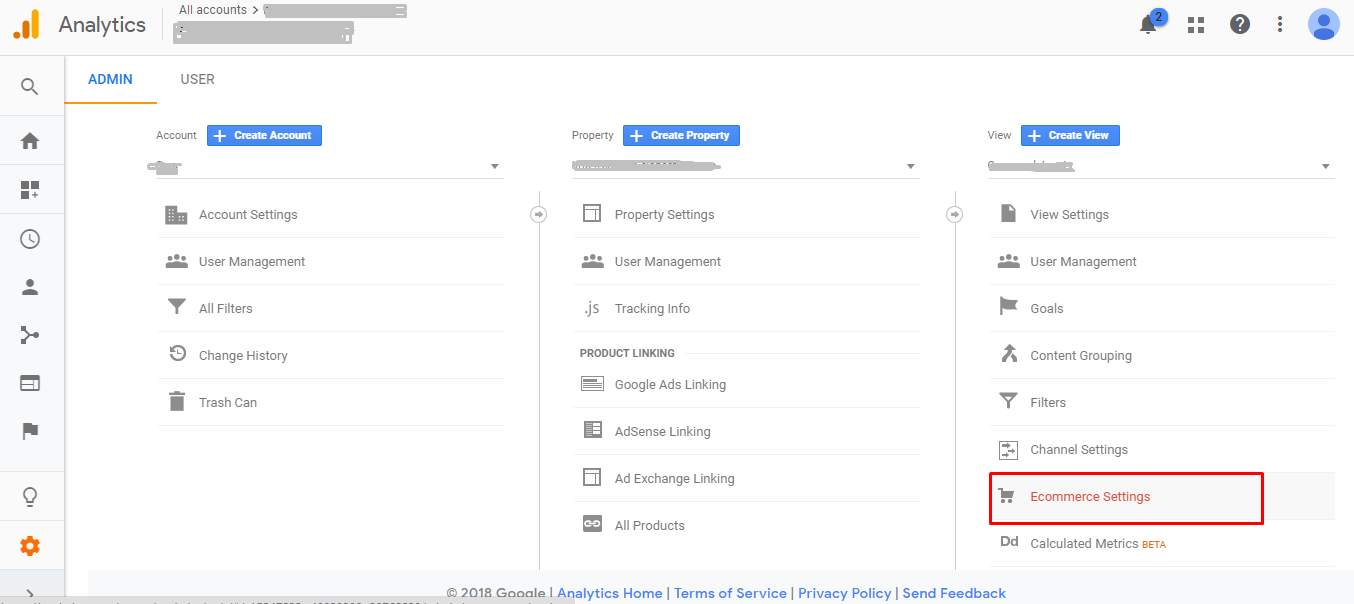
Start by accessing the Admin panel (lower left corner) and select Ecommerce Settings for the view you want.
Quick note: the panel is divided into three columns: accounts, properties, and views. If you have more than one account and one site (property) registered to Analytics, make sure to select your ecommerce business. If not, the ecommerce property will be selected by default.
In the next window, switch Enable Ecommerce ON and you have the option to also switch Enable Enhanced Ecommerce Reporting ON.
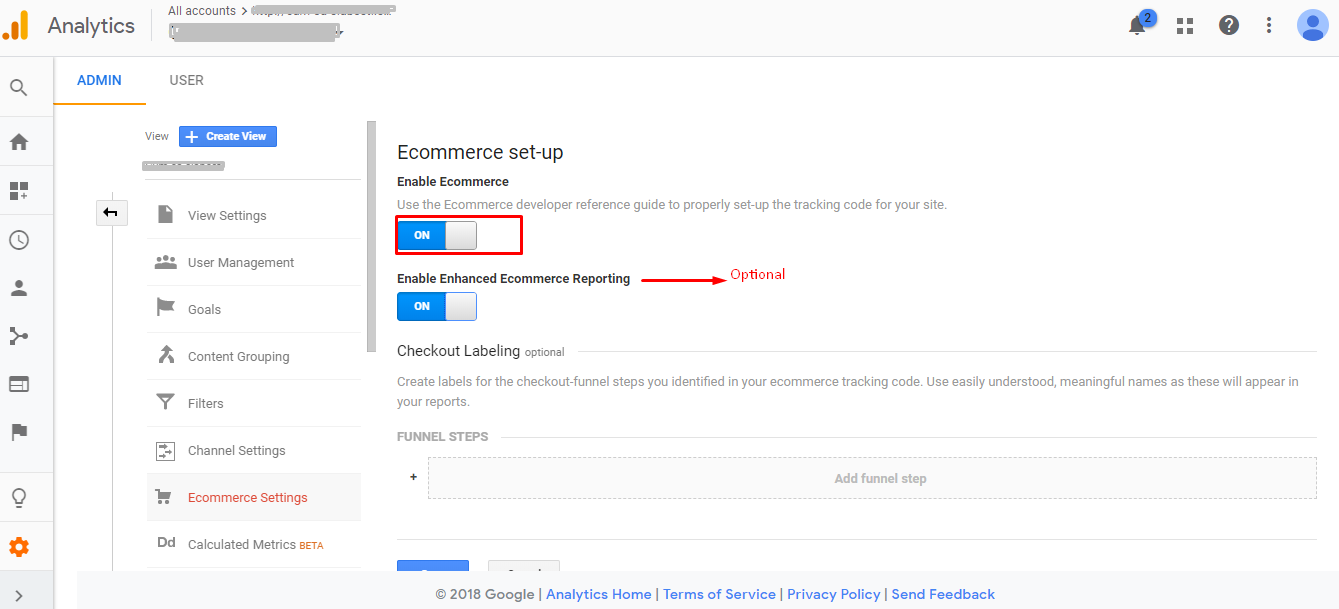
Once you’re happy with the settings, click Save.
This step is optional but can be extremely useful because it allows for more detailed reports on users’ behavior.
For instance, with Enhanced Ecommerce Reporting ON, you also get to see a Checkout Behavior Analysis where you learn where people usually drop off through the funnel of the entire website. Furthermore, you can get a funnel view based on each user group (for instance, number of visits with product views or number of visits with Add to Cart action).
Finally, the Enhanced Ecommerce Reporting module also offers a better analysis of product performance. Data such as the number of people who viewed the product vs. the number of people who went through with the purchase is extremely insightful.
Quick note: If you have several views for the same property, you will have to follow these steps for each view in which you want to see ecommerce data.
#2: Add the Tracking Code
If with a standard Analytics account all you have to do is copy-paste the provided code onto the site, with ecommerce tracking things are a bit more complicated. We recommend enlisting the help of a professional who knows how Analytics links to the ecommerce platform you’re using and can implement the tracking code.
Google Analytics provides two helpful guides for both ecommerce tracking and enhanced ecommerce, so you could learn how to do it if you understand HTML and JavaScript at least at a basic level. Based on these guidelines, you also have to set-up cross-domain tracking, so you’ll get the data from the shopping cart platform. Cross-domain tracking is necessary for all platforms unless you’re using Shopify, which is easier to integrate with ecommerce Analytics.
The cross-domain tracking system is important because Analytics can’t access cookies from different domains unless you’re setting up the linking features that allow for the Client-ID parameter to be sent using the URL (more about this here).
#3: Turn ON Site Search Tracking
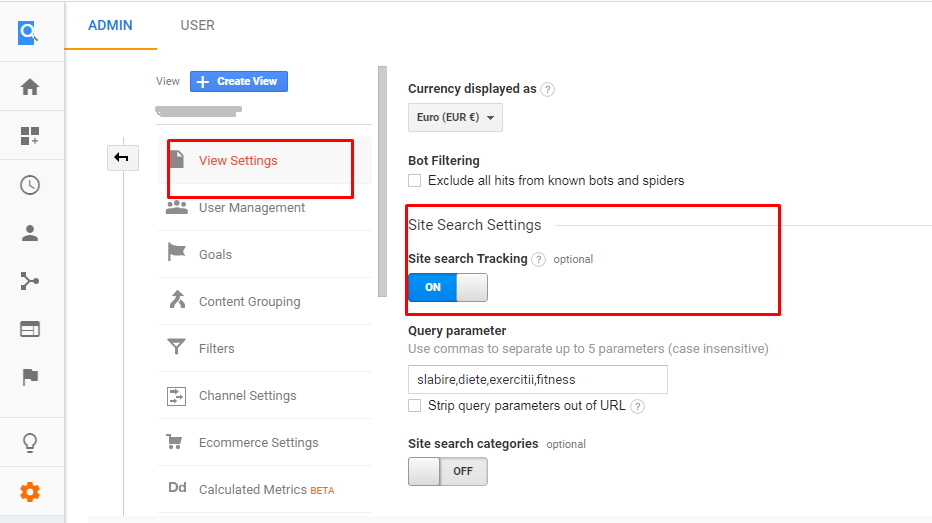
This step is completely optional, but it may bring more insight into what your customers are searching for. When Site Search Tracking is ON, it offers information on the services or products that are most popular among visitors.
Now, to activate it, select View and click on View Settings. Find Site Search Settings and turn ON the Site search tracking option.
#4: Test the Implementation
Once everything is set up, do several test transactions to see if everything works as it should. You may also notice a difference between what you see in Google Analytics and the data provided by the shopping cart platform, but these are normal when running tests.
Also, it’s normal to see discrepancies even when you’re not running tests because the analytics from Google doesn’t make a difference between canceled and unfulfilled orders, partial orders, discount codes, and regular orders. This happens because the tracker code from Google activates once the user sees the confirmation page (or the ‘Thank You’ page).
On the other hand, your shopping cart analytics knows how to differentiate all these. Still, Google Analytics’ job is not to accurately track sales but to give you information on users’ behavior.
Set Up Goals
When it comes to ecommerce, the main goal is purchases, but you can also set up goals that follow micro-conversions (like checking KPI performance, tracking newsletter sign-ups, or visits to a certain page).
The secret is to never stray from the main business objective, which is increasing sales.
To set up goals, you will need to use the view for your ecommerce business in Google Analytics. Go to Admin → Goals → click on the +New Goal button.
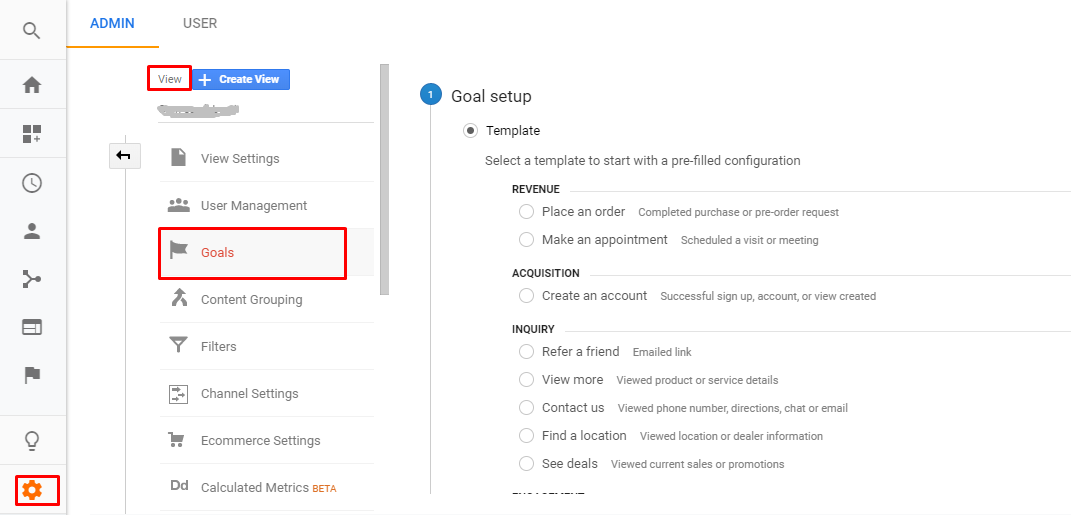
From here, you have two options:
- Choose a template, that will automatically fill the data and select the best type of action to track;
- Choose to customize it (Custom), where you choose the type of goal (4 options) and add in the data.
Quick tip: There is also an option called ‘Import from Gallery’ that will upload pre-set up goals provided by Google. These are great to use as samples, when the inspiration is running low.
Setting up a Purchase Goal (Custom)
Start by giving your goal a name (it can be anything you want, but it should hint on the action it tracks so you’ll understand it later).
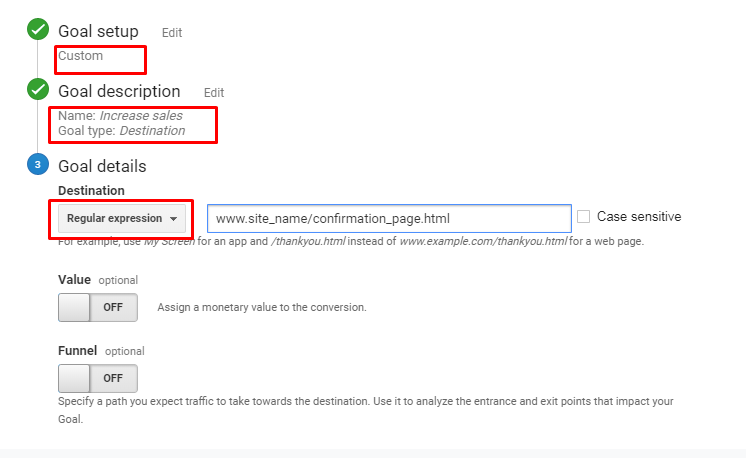
Under Goal Description choose Destination and under Goal Details, select Regular Expression, with a link to your confirmation page (or ‘Thank You!’ page). Before saving everything, click on Verify this Goal to make sure the URL is correct.
Interpreting the Ecommerce Metrics
Now that your Google Analytics for ecommerce is all set up and running, it’s time to understand how to read the data it provides.
First, you should know there are two types of ecommerce data: transaction data and item data.
Transaction data provides information about transactions made by users. These include:
- the ID of a transaction,
- total revenue generated (usually includes tax and shipping),
- tax to be deducted from revenue
- shipping cost.
On the other hand, item data is all about purchased products:
- Product code,
- Price,
- Name,
- Quantity,
- Category, and so on.
Both transaction and item data are registered when a conversion is completed (or when the user sees the Thank You page). So, you don’t just get the number of conversions, you get all the details that matter about each conversion mashed into easy-to-understand reports.
Now, to access the data, open your Analytics page and go to Conversions à Ecommerce (from the left side menu). Under the Ecommerce tab, you’ll find the following categories (without Enhanced Ecommerce Reporting activated):
- Overview
- Product Performance
- Sales Performance
- Transactions
- Time to Purchase
You probably already know that the Overview tab mashes everything together, creating a detailed look over the ecommerce side of your business. You get to see how the revenue and conversion rates are doing, the number of transactions, and the average value per order.
The Overview tab is great, but if you want to see more detailed information, we recommend checking the Product Performance tab. Here you can track each product and see how much revenue it generated in a certain period of time. You also get other useful information such as the number of unique purchases, quantity, and average price.
Wrap Up
Overall, the ecommerce section of the Google Analytics platform is very similar to the standard version, but it works with different data such as transactions, revenue, products, and orders.
These are the data that make a difference and help ecommerce businesses develop and improve, so you shouldn’t ignore them. Especially when you have such a finely-tuned tool at your disposal!